Home » Articles posted by Hester Orr
Author Archives: Hester Orr
The Basics of Plumbing Installation
Plumbing follows the basic laws of nature- gravity, pressure, and water seeking their level. Understanding these basics can help make dozens of plumbing “mysteries” disappear.
In new construction, the plumbing rough-in process takes place before hanging drywall. This involves setting sewer accommodation stubs and installing drain fittings in the walls for sinks, tubs, and showers. Then, the supply and waste lines are installed, followed by power wiring, which must be run around pipes. Visit Website to learn more.
Your plumbing system’s drainage and venting functions work together to remove wastewater from your home. Drainage pipes send sewage out of your house to the main sewer line, which leads to either the municipal sewer system or your septic tank (if you have one). Venting keeps air flowing through the drain pipe so that the sewage doesn’t create a vacuum and back up into your house.
Each drain pipe in your home connects to a trap, which is usually P-shaped and holds water that prevents sewer gases from entering your living spaces. Traps need to be emptied regularly to keep the water from evaporating and letting sewer gases into your home. Every drain also has a vent that carries air up through the plumbing system. Vents need to be properly sized and routed so that they don’t create a suction that pulls waste down the drain.
Most of the drain pipes in your home are connected to a vertical stack of ventilation pipes called a vent-waste-vent, or DWV, system. The DWV stack is made up of a series of pipes that connect to branch drains, which lead to individual fixtures such as toilets and sinks. Each fixture has its own drain trap, and the piping for the drains and vents is sized to match that of the corresponding fixture.
All DWV pipes need to be vented properly, and building codes have specific requirements for the size and location of venting. For example, a drainpipe must slope 1/4 inch per foot to avoid a clog. Vent pipes must extend outside the building according to code, and they should be at least six inches above roof level or 12 inches away from vertical walls. If a pipe can’t extend that far, a Y-fitting can be used to turn the vent into a downpipe that drops out of a wall and is hidden behind a fixture.
Most homes rely on multiple venting options, including true vent pipes that admit air but never carry water, wet vents, and re-vent pipes (also known as auxiliary vents). Each option has its advantages and disadvantages, but all must meet code requirements for size and placement.
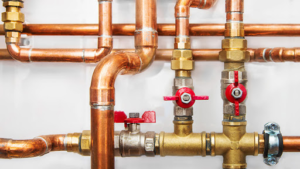
Supply lines deliver fresh water to sinks, toilets, showers and other fixtures in your home. They connect from your main water line to a valve near each fixture, where the water then either branches off for hot or cold. Water lines also run to outdoor faucets and water heaters.
Most plumbing professionals use copper supply lines, which are durable and corrosion-resistant. However, PEX (cross-linked polyethylene) pipes are an increasingly popular choice for new construction and renovation projects. PEX is more flexible than copper and has a lower price tag. Plus, it’s easy to work with and meets plumbing code requirements for use in household water lines.
Depending on the size of your house and its plumbing system, you may need to buy multiple lengths of water supply line. When choosing a length, make sure you have enough room for the line to reach from the stop valve to the fixture inlet. Also, consider the type of pipe connector you’ll need for your specific fixture installation — there are many different sizes and configurations available.
When installing copper supply lines, be careful not to kink the lines or bend them too tightly. This could reduce their lifespan and cause them to leak. In addition, copper is easily dented or punctured by nails in studs, so it’s important to position them away from walls and install nailing plates on drywall.
The best way to protect your pipes from rust, corrosion and other problems is by maintaining proper water pressure and minimizing the amount of hot and cold water running at any one time. For the latter, you can reduce demand by shutting off excess water flow when you’re not using a fixture.
While many homeowners call a plumber when their plumbing fixtures start to show signs of trouble, you can handle some minor repairs yourself with the right tools, knowledge and elbow grease. For instance, if you notice low water pressure or wet spots around your sinks and tubs, you may be able to fix the problem by tightening fittings or changing the washers on the valves.
A plumbing fixture is an exchangeable device that connects to a home’s water and waste systems. Common fixtures include toilets, sinks, tubs and showers. They are usually made with durable materials and can add a decorative touch to your home’s design. However, it is important to choose the right fixtures for your home. A plumber can help you select the best fixtures for your needs and budget, as well as provide professional installation services.
The most important consideration when selecting plumbing fixtures is their quality and durability. Higher-quality fixtures may cost more upfront, but they will last longer and save you money in the long run by reducing your energy costs and maintenance expenses. You should also consider how long you plan to live in your current home when choosing fixtures. If you have a 30-year mortgage, it is more cost-effective to invest in high-quality fixtures that will last longer than lower-quality options.
When selecting plumbing fixtures, it is also important to take into account their aesthetics. Some fixtures come in a variety of styles and finishes, allowing you to customize your bathroom or kitchen’s decor. For example, sinks and faucets are available in a range of materials and can be finished with different handles and knobs. You can even find fixtures with unique designs, such as a waterfall-style faucet or a clawfoot tub.
Another important factor to consider when selecting plumbing fixtures is their energy and water efficiency. Newer fixtures, such as low-flow taps and water-efficient showerheads, can help you save money on your energy bills while still maintaining the performance you expect from your plumbing.
When choosing plumbing fixtures, you should also keep in mind your budget and any restrictions that may apply. For instance, if you’re renovating your entire bathroom, it’s a good idea to consult with a plumber who can recommend the best fixtures for your space and budget. They can also help you prioritize your upgrades based on your household’s needs and water usage, as well as local building codes and regulations. This way, you can be sure that your plumbing upgrades will meet all the necessary requirements.
New construction plumbing may seem complicated, but it is generally broken down into three stages: installing the sewer accommodation stubs, the rough-in plumbing, and then the finish plumbing. These steps are crucial to ensure a smooth and durable plumbing installation that will stand up to years of use.
In the initial stage of plumbing installation, a plumber sets the sewer accommodation stubs to connect the home to the municipal sewer line. This is typically done before the concrete foundation is poured. During the rough-in phase, plumbers install water pipes and drain lines to accommodate fixtures like sinks, bathtubs, and toilets. They also make sure that all drains have vents to prevent backflow and that all water supply valves are in place. This phase usually occurs before the walls are framed, but it can be delayed if weather is unfavorable or if plumbing fixtures aren’t yet in stock.
Plumbing professionals inspect the blueprints to determine where to locate all pipe runs and venting, including where the water heater will go. They then drill holes for these pipes to avoid disrupting other building materials or existing plumbing. They might also check for any existing water leaks to see how severe they are. The plumber then caps any open water lines and tests for leaks before moving on to the next step.
Once all the pipes and venting are in place, they can begin installing plumbing fixtures. This process can be a bit more time-consuming than other phases because plumbers must carefully set each fixture to avoid blocking or damaging any of the surrounding wall or floor material. Additionally, some plumbing fixtures aren’t easy to move once they’re in place. For example, tubs and freestanding showers are often too large to set once the walls are framed, so they’re installed during the final stage of plumbing installation.
Professional plumbers follow strict installation guidelines to minimize the risk of future problems. They’re licensed and insured, so you can be confident that they’ll do the job correctly and safely. Plus, they offer post-installation support in case any issues arise. Choosing the right plumber can save you both time and money in the long run.
Kitchen Remodeling – How to Get the Job Done Right
A kitchen can improve the look and feel of a home, boost resale value, and increase its functionality. But the process can be difficult and time-consuming, so it’s important to plan ahead.
Start by determining your scope, which can range from a cosmetic refresh to total gut renovation. Next, decide whether you want to DIY or hire professionals for the job. However, if you need some professional assistance, just contact Kitchen Remodeling Temecula.
Demolition can be a nerve-wracking and frustrating part of any renovation project, but it is important to do it right. You want to make sure you get the job done right so you can avoid a long and costly repair job down the road.
First and foremost, you want to make sure that you have the right tools for this process. Having the proper hammer, pry bar, and other tools will make it easier for you to remove materials from the building or property.
You also need to make sure that the site is prepared for demolition, including turning off utilities and having a professional check for safety issues. If you do not have these things checked, you can end up causing an explosion or leak in your home.
To prepare for the demolition of your kitchen, you need to pack up all the items that you want to keep in the room before the demolition starts. This may include dishes, plates, glasses, pots and pans, and other kitchen appliances. You should also clean the cabinets and empty out the refrigerator before you start.
Once you have all of your kitchen items packed up, it’s time to begin the demolition process. You will need to tear out all of the old flooring and fixtures in order to start the remodel.
The team that you hire for your kitchen remodeling project should come equipped with the right tools to perform this work efficiently and safely. They should have a sledgehammer, crowbar, pry bar, and a reciprocating saw on hand.
Depending on the amount of work that needs to be done, it can take anywhere from a few days to a couple of weeks for a contractor to tear out your kitchen and start construction. A good contractor will be able to give you an estimate of how much time it will take for them to complete the project.
When deciding to have a professional come in and do your kitchen demolition, you should consider the price. A professional is going to charge more for the work, but they are also more experienced and will likely do a better job.
Design is the process of bringing together all aspects of a project and making sure it delivers on the expectations of both the client and the contractor. For the kitchen, this can include layout, materials, lighting, appliances, and more.
A kitchen is one of the most important rooms in a home. It’s where you cook meals, spend time with your family, and entertain guests. As such, it should be designed to accommodate all of these activities in a way that is both comfortable and attractive.
The first step in planning a kitchen remodel is to identify the existing issues that need to be addressed. Whether the space is too small or the cabinets are outdated, it’s vital to understand what needs to be done to fix these problems.
There are a variety of options for kitchen design, including working with an architect or interior designer or partnering with a design-build firm. A design-build firm usually handles both design and construction tasks, so you can count on a streamlined process from start to finish.
When choosing a kitchen designer, be sure to ask how often they work on kitchen remodels and for what type of projects. You want to ensure that they’re available to answer your questions and are able to make time for your project.
Another important question is what kind of design tools they use to convey their ideas to you. Some designers create detailed computer renderings that look great on a screen, while others prefer simpler methods that allow them to convey their ideas in a way that’s more suited to your needs.